Love this? Save it for later!
Share the inspiration with your friends
I was standing in the bulk foods aisle of a grocery store last Tuesday, staring at a wall of instant ramen packets, when this wave of heat and garlic hit my memory. Not the actual smell, you know—just the ghost of it. And suddenly I was nineteen, sitting cross-legged on a stained carpet in a dorm room that smelled like unwashed laundry and desperation, eating the most incredible bowl of noodles I’d ever made with my own two hands.
That was the first time I realized you could take those sad, thirty-nine-cent packets and actually make them taste like something. Like real food. Like something you’d actually want to eat, not just something you ate because your bank account had forty-two dollars in it and rent was due next week.
I’d been living on plain ramen for three weeks at that point—no egg, no veggies, nothing. Just the brick and the powder, boiled in a cheap electric kettle that my roommate’s mom bought at a thrift store. Honestly, I thought I was being smart. I mean, why complicate things? But then my friend Marco from down the hall walked past my open door, saw me hunched over my bowl, and just shook his head. “Bro,” he said. “You’re doing it wrong.”
Fifteen minutes later, he was in my tiny kitchenette—if you could call a hot plate and a mini-fridge a kitchenette—showing me how to crack an egg into the boiling broth, how to add a splash of soy sauce and a handful of frozen vegetables. I remember thinking, this is illegal somehow. Like you weren’t allowed to make something this good for under two dollars.
That bowl changed everything for me. Not in some dramatic, life-altering way—I didn’t become a chef or anything. But it taught me that good food doesn’t have to be expensive or complicated. It just needs a little love and a few smart moves. And maybe you’ve been there too, eating something that’s technically food but doesn’t feel like a meal. This easy budget dorm ramen upgrade bowl is my way of paying that lesson forward.
Why You’ll Love This Recipe
Let me be real with you for a second. I’ve tested this easy budget dorm ramen upgrade bowl more times than I care to admit—sometimes on purpose, sometimes because I was broke and hungry at one in the morning. And every single time, it delivers. Here’s why this version stands out from every other “fancy ramen” hack you’ve seen online.
- Quick & Easy: We’re talking ten minutes, max. From packet to bowl in the time it takes to find something decent to watch on Netflix. Perfect for those nights when you’re starving and your patience is running thin.
- Simple Ingredients: I’m willing to bet you already have most of these in your pantry right now. No fancy trips to specialty stores, no weird ingredients you’ll use once and forget about. Just honest, affordable staples.
- Perfect for Late-Night Cravings: Whether you’re pulling an all-nighter in the dorm, coming home from a late shift, or just need something warm and comforting at midnight, this bowl has your back.
- Crowd-Pleaser: I’ve made this for friends who swore they were “over” ramen, and they always ask for seconds. It’s got that addictive quality that makes people lean in and get quiet while they eat.
- Unbelievably Delicious: The texture here is the real magic. You get the slurpy noodles, the jammy egg yolk coating everything, the little pops of sweetness from corn, and that savory broth that clings to every bite. It’s comfort in a bowl, no question.
What makes this different from the other ramen hacks out there? It’s the balance. I’m not just throwing random stuff in a bowl and calling it gourmet. Every addition has a purpose—the egg adds richness, the vegetables add texture and nutrition, the seasoning blend wakes everything up without overpowering it. This isn’t just another version of upgraded ramen. It’s the version I’ve perfected over years of late-night cooking, the one that makes you close your eyes after the first bite and forget that your electric bill is due tomorrow.
It’s comfort food reimagined—cheaper, faster, but with the same soul-soothing satisfaction that makes you feel like everything’s going to be okay, at least for the next ten minutes.
What Ingredients You Will Need
This recipe uses simple, everyday ingredients that work together to create something way bigger than the sum of their parts. Most of these are pantry staples you probably already have, and the ones you don’t are easy to find at any grocery store for pocket change.
For the Base
- 1 package instant ramen noodles (3 ounces / 85 grams) – any brand works, but I personally prefer Maruchan or Nissin for texture. Save the seasoning packet—you’ll use it.
- 2 cups water (480 ml) – enough to cook the noodles and create a generous broth base.
For the Upgrade
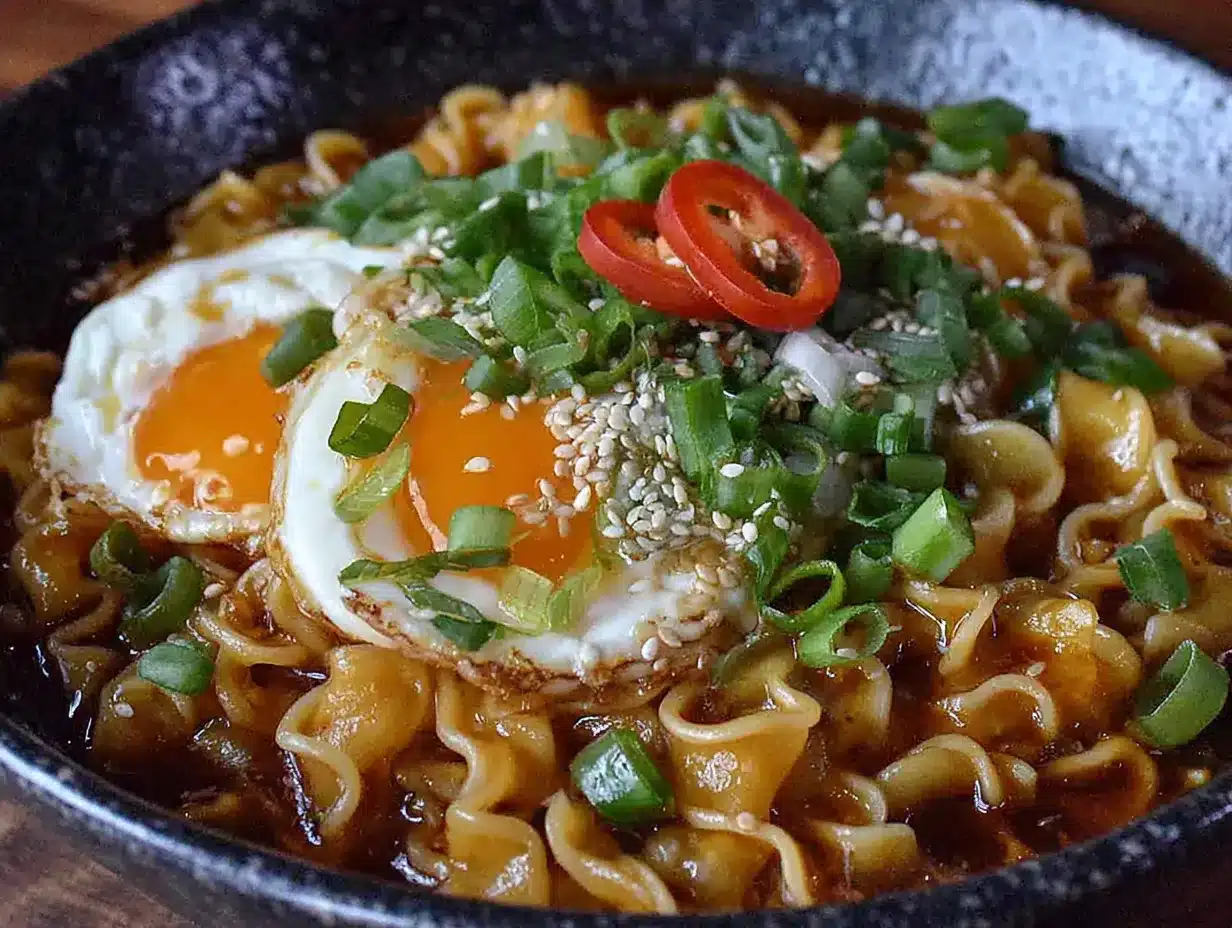
- 1 large egg – room temperature if you can manage it (adds richness and makes the broth silkier).
- ¼ cup frozen mixed vegetables (about 35 grams) – corn, peas, carrots, the classic mix. No need to thaw them first.
- 1 tablespoon soy sauce (15 ml) – adds that savory umami kick. I recommend Kikkoman or San-J for consistent flavor.
- 1 teaspoon sesame oil (5 ml) – this is the secret weapon. A little goes a long way, but don’t skip it.
- ½ teaspoon garlic powder – or 1 small clove fresh garlic, minced if you have it.
- ½ teaspoon ginger powder – optional but highly recommended for warmth.
- 1 teaspoon sriracha or chili crisp (optional) – for heat lovers. I’m partial to Lao Gan Ma chili crisp when I can find it.
- ¼ cup sliced green onions (about 2 stalks) – for freshness and color.
Optional Add-Ins (Mix and Match)
- ¼ cup cooked chicken, shredded or diced – leftover rotisserie chicken works great.
- ½ cup fresh spinach or bok choy – wilts right into the broth for extra greens.
- 1 tablespoon butter – sounds weird, adds incredible richness. Trust me on this one.
- 1 teaspoon rice vinegar – a splash of acidity brightens everything up.
- ¼ cup canned corn, drained – if you don’t have frozen mixed veggies.
A quick note on ingredient selection: when you’re shopping for ramen, look for packets rather than cups—they’re cheaper and give you more control over the cooking process. For the egg, fresher is better, especially if you’re going for that jammy yolk. And please, please don’t use that sad, expired bottle of soy sauce that’s been sitting in your pantry since 2019. Get a fresh one. Your taste buds will thank you.
If you’re watching your sodium, you can use low-sodium soy sauce and only half the seasoning packet. The flavor will still be there, I promise.
Equipment Needed
One of the best things about this easy budget dorm ramen upgrade bowl is that you don’t need a fancy kitchen to make it happen. Here’s what you’ll need:
- Small saucepan or pot (1.5 to 2 quarts / about 2 liters) – if you’re in a dorm without a stove, an electric kettle or microwave-safe bowl works too. I’ve made this in a coffee pot once. Desperate times.
- Cutting board and knife – for slicing the green onions and any fresh veggies. A butter knife works in a pinch.
- Measuring spoons – or just eyeball it like I do most nights. The soy sauce and sesame oil are forgiving.
- Fork or chopsticks – for stirring and eating. Chopsticks make it feel more authentic, but a fork gets the job done.
- Mug or small bowl – for cracking the egg into before adding it to the pot. This saves you from fishing out shell pieces if you mess up.
If you don’t have a stove, here’s the microwave method: cook the noodles in a microwave-safe bowl with water for 2-3 minutes, then stir in the egg and vegetables and microwave for another 30-45 seconds. It’s not quite as good as stovetop, but it works when you’re in a dorm or office break room.
I’ve been using the same $12 saucepan from a discount store for years, and it’s never let me down. You don’t need expensive equipment—just something that holds heat and doesn’t leak.
Preparation Method
Alright, let’s get cooking. This whole process takes about ten minutes, so don’t wander off. You’ll want to be present for this one.
- Bring the water to a boil (2-3 minutes). Pour 2 cups of water into your saucepan and set it over high heat. If you’re using an electric kettle, boil the water there and then pour it into the pot. While you’re waiting, take a moment to slice your green onions and crack your egg into a small bowl or mug. Trust me on the mug thing—I’ve lost count of how many times I’ve dropped shell bits into the pot because I was trying to crack an egg one-handed.
- Add the noodles and vegetables (3 minutes). Once the water is boiling, drop in your ramen brick and the frozen vegetables. Break the noodle block apart gently with your fork—don’t smash it, just separate the layers. Let everything boil together for about 2 minutes, stirring occasionally. The noodles should be starting to loosen up but still have a little bite to them. You’re looking for that moment when the noodles go from a solid block to individual strands that dance around in the water.
- Add the egg (1 minute). Here’s where the magic happens. Reduce the heat to medium-low so the water is at a gentle simmer, not a rolling boil. Gently pour the egg into the pot, stirring slowly in one direction. You want those wispy egg ribbons, not scrambled egg chunks. If you prefer a poached egg, don’t stir—just let it sit in the simmering water for about 45 seconds until the white is set but the yolk is still runny. I’ve done it both ways, and honestly, the ribbon method is more forgiving for beginners.
- Season the broth (30 seconds). Sprinkle in about half the ramen seasoning packet, then add the soy sauce, sesame oil, garlic powder, and ginger powder. Stir gently to combine. Taste the broth—it should be savory with a slight nuttiness from the sesame oil. If it needs more salt, add more seasoning packet a little at a time. Remember, you can always add more but you can’t take it out.
- Add the finishing touches (30 seconds). If you’re using sriracha or chili crisp, stir it in now. Drop in the sliced green onions, reserving a few for garnish. Let everything cook together for another 30 seconds so the flavors meld. The broth should be steaming and fragrant at this point—that’s how you know it’s ready.
- Serve immediately. Pour everything into your favorite bowl—the bigger the better, because you’re going to want to slurp every last drop. Top with the reserved green onions and any extra toppings you have on hand (a sprinkle of sesame seeds, a drizzle of chili oil, maybe a sheet of nori torn into pieces if you’re feeling fancy).
Pro tip: If you’re making this in a dorm room with a shared kitchen, try to cook during off-peak hours. Nothing kills the vibe like having to wait for the stove while your noodles get cold. I learned this the hard way during finals week sophomore year.
Cooking Tips & Techniques
After years of perfecting this easy budget dorm ramen upgrade bowl, I’ve picked up a few tricks that make a real difference. Here’s what I wish someone had told me back in my ramen-only days.
Don’t overcook the noodles. This is the most common mistake I see. Instant ramen cooks fast—usually 2-3 minutes max. If you let it go longer, you’ll end up with mushy, sad noodles that fall apart in your broth. Pull them off the heat when they still have a slight resistance in the center. They’ll continue cooking in the hot broth while you eat.
Season in layers. Here’s something I figured out after too many bland bowls: don’t dump all the seasoning packet in at once. Start with half, taste, and adjust. The soy sauce and other add-ins also bring salt, so you need to account for that. I’ve ruined plenty of bowls by being heavy-handed with the seasoning packet, and let me tell you, there’s no coming back from that sodium overload.
Toast your sesame oil. This is a pro move I picked up from a cooking blog years ago. Before adding the oil to the broth, drizzle it into the empty pot over medium heat for about 15 seconds. It’ll become nuttier and more aromatic. Just don’t walk away—sesame oil burns fast, and burnt sesame oil tastes like regret.
Use the residual heat. When you add the green onions, don’t cook them. Just stir them in at the very end and let the hot broth wilt them gently. They’ll stay brighter and fresher-tasting that way. Same goes for spinach or bok choy—add them right before you serve.
Master the egg. This took me a while to get right. For ribbon eggs, the water needs to be at a gentle simmer, not a vigorous boil. For a poached egg, make a gentle whirlpool in the water before dropping the egg in. And always, always crack the egg into a separate bowl first. I can’t stress this enough. One rogue piece of shell in your broth, and suddenly you’re playing operation with chopsticks.
Multitask smart. While the water’s boiling, prep your toppings. While the noodles are cooking, measure your seasonings. This recipe comes together fast, so having everything ready to go makes the process smooth and stress-free. I used to scramble around my kitchenette like a maniac, and it always ended with something burning or me forgetting an ingredient.
Variations & Adaptations
One of the best things about this easy budget dorm ramen upgrade bowl is how adaptable it is. Here are some variations I’ve tried and loved over the years.
Spicy Kimchi Ramen: Add ¼ cup chopped kimchi and a tablespoon of kimchi juice to the broth along with the seasoning. The tangy, spicy flavor takes this in a completely different direction. I discovered this combo during a particularly cold winter when I needed something warming and punchy. It’s become my go-to when I’m fighting off a cold.
Peanut Butter Ramen (Yes, Really): Stir in 1 tablespoon of creamy peanut butter and an extra splash of soy sauce. It sounds weird, I know, but it creates this rich, nutty broth that’s similar to Thai satay. I was skeptical the first time a friend suggested it, but one bite converted me. Just make sure to whisk the peanut butter in thoroughly so it doesn’t clump.
Vegetarian/Vegan Version: Skip the egg and use a plant-based protein like tofu puffs or edamame. Use vegetable broth instead of water for extra flavor, and add a teaspoon of miso paste for depth. I’ve made this for vegan friends, and they always ask for the recipe. The key is building umami through ingredients like mushrooms, seaweed, or nutritional yeast.
Breakfast Ramen: Cook the noodles, then crack an egg directly into the pot and let it poach. Add a slice of American cheese on top (don’t knock it till you’ve tried it) and a sprinkle of everything bagel seasoning. It’s weirdly perfect for hungover mornings or late-night study sessions. The cheese melts into the broth and makes it almost creamy.
Protein-Packed Version: Add leftover shredded chicken, canned tuna (drained), or even sliced hot dogs if that’s what you have. I’ve used all of these at different points, and each one brings something different to the bowl. The chicken is my favorite, but the hot dog version has a certain nostalgic charm that reminds me of childhood cookouts.
Cold Ramen Salad: Cook the noodles, drain them, and rinse under cold water. Toss with the vegetables, a dressing made from the seasoning packet mixed with rice vinegar and sesame oil, and serve cold. It’s a completely different dish but equally satisfying on hot summer days.
Serving & Storage Suggestions
This easy budget dorm ramen upgrade bowl is best enjoyed immediately, while the noodles are still springy and the broth is piping hot. But I know life doesn’t always work out that way, so here’s what you need to know.
Serving Temperature: Serve this bowl hot—like, steam-rising-from-the-surface hot. The broth should be warm enough to slightly burn your tongue on the first sip (in a good way). If it’s lukewarm, the noodles get clumpy and the egg loses its magic.
Presentation: Pour everything into a wide, shallow bowl if you have one. Arrange your toppings artfully on top—green onions scattered, a drizzle of chili oil, maybe a sprinkle of sesame seeds. It takes ten seconds but makes the bowl look like it came from a restaurant. I always eat with my eyes first, and a pretty bowl tastes better somehow.
What to Serve With: This bowl is a meal on its own, but if you’re feeding a crowd or just feeling extra hungry, some simple sides work well. A quick cucumber salad with rice vinegar, some edamame sprinkled with sea salt, or a few gyoza from the freezer section all complement the ramen beautifully. On cold nights, I’ll also make a cup of green tea to sip alongside.
Storage: Look, I’m going to be honest with you—ramen doesn’t store well. The noodles absorb the broth and turn into a mushy mess within an hour. If you absolutely must save leftovers, store the noodles and broth separately in airtight containers in the refrigerator. They’ll keep for about 2 days, but the texture won’t be the same. The broth alone can be frozen for up to 3 months.
Reheating: If you’re reheating, do it on the stovetop with a splash of water to thin the broth. Microwave reheating tends to make the noodles rubbery. Bring the broth to a simmer, add the noodles, and heat for just 1-2 minutes. Don’t try to reheat the egg—it’ll turn into a rubbery mess. Just make a fresh one to add on top.
Flavor Development: Here’s something interesting—the broth actually tastes better the next day. The flavors meld and deepen overnight. So if you’re meal-prepping, make the broth base ahead of time and cook fresh noodles when you’re ready to eat. That’s my secret for making this bowl feel extra special even on busy weeknights.
Nutritional Information & Benefits
Let’s talk numbers. One serving of this easy budget dorm ramen upgrade bowl (using the basic recipe with egg and vegetables) contains approximately:
- Calories: 380-420
- Protein: 14-16 grams
- Carbohydrates: 45-50 grams
- Fat: 16-18 grams
- Fiber: 3-4 grams
- Sodium: 800-1000 mg (varies based on seasoning packet use)
These numbers will shift depending on your add-ins. Adding chicken bumps the protein to around 25 grams, while the peanut butter version adds healthy fats and a little more protein.
Health Benefits: Despite its humble origins, this bowl actually has some redeeming nutritional qualities. The egg provides high-quality protein and choline, which supports brain health—perfect for those late-night study sessions. The vegetables add fiber, vitamins A and C, and antioxidants. Sesame oil contains healthy unsaturated fats and has anti-inflammatory properties. And the ginger, if you use it, can help with digestion and nausea.
Dietary Considerations: This recipe is naturally dairy-free (unless you add butter) and can be made gluten-free by using rice noodles or gluten-free ramen. To make it lower sodium, use only half the seasoning packet and low-sodium soy sauce. For a lower-carb version, swap the noodles for zucchini noodles or shirataki noodles—just adjust the cooking time accordingly.
Potential Allergens: This recipe contains wheat (noodles), soy (soy sauce), eggs, and sesame (sesame oil). If you have allergies, look for certified gluten-free ramen, use coconut aminos instead of soy sauce, and skip the egg or use a plant-based alternative.
I’m not a nutritionist, and these numbers are estimates based on standard ingredient brands. But I will say this—this bowl makes me feel good. It’s filling without being heavy, and it gives me energy without the crash that comes from processed snacks. Sometimes that’s enough.
Conclusion
So there you have it—my easy budget dorm ramen upgrade bowl, the recipe that turned me from a broke college student surviving on sad noodles into someone who actually looks forward to ramen night. It’s proof that you don’t need a fancy kitchen, a big budget, or culinary training to make something genuinely delicious.
What I love most about this recipe is how forgiving it is. You can tweak it based on what you have in your fridge, adjust the spice level to match your mood, or bulk it up with whatever protein you can find. It’s not about following rules—it’s about making something that feels good and tastes even better.
I’d love to hear how your version turns out. Did you try the peanut butter hack? Add something weird that actually worked? Drop a comment below and let me know—I’m always looking for new ideas to test out. And if you know someone who’s living on plain ramen and needs an upgrade, send them this post. Trust me, they’ll thank you.
Until next time, keep your broth hot and your noodles bouncy.
Frequently Asked Questions
Can I make this in a microwave if I don’t have a stove?
Absolutely! Cook the noodles in a microwave-safe bowl with water for 2-3 minutes, then stir in the egg and vegetables and microwave for another 30-45 seconds. The texture won’t be quite as good as stovetop, but it’s still delicious and takes even less time.
How can I reduce the sodium in this recipe?
Use only half the ramen seasoning packet and swap regular soy sauce for low-sodium soy sauce. You can also add extra vegetables and a squeeze of lime juice to boost flavor without adding salt. The broth will still be tasty, I promise.
Can I meal prep this for the week?
Sort of. I recommend making the broth base ahead of time and storing it in the fridge for up to 3 days. When you’re ready to eat, cook fresh noodles and add a freshly made egg. The noodles don’t hold up well when stored in the broth, so always cook them fresh.
What’s the best way to get a jammy egg in ramen?
For a poached egg, simmer it gently in the broth for about 45 seconds to 1 minute, until the white is set but the yolk is still runny. For a soft-boiled egg, cook it separately in boiling water for exactly 6 minutes, then plunge it into ice water before peeling and adding to your bowl.
Can I use different noodles instead of instant ramen?
Yes! Rice noodles, soba noodles, or even spaghetti work in a pinch. Just adjust the cooking time according to the package instructions. Fresh ramen noodles from the refrigerated section are amazing if you can find them, but they cost a bit more and take slightly longer to cook.
Pin This Recipe!

Easy Budget Dorm Ramen Upgrade Bowl Recipe

Transform a 39-cent packet of instant ramen into a delicious, satisfying meal with simple upgrades like an egg, frozen vegetables, soy sauce, and sesame oil. This quick and easy recipe is perfect for late-night cravings, dorm cooking, or anyone looking to eat well on a budget.
- Prep Time: 5 minutes
- Cook Time: 10 minutes
- Total Time: 15 minutes
- Yield: 1 serving 1x
- Category: Main Course
- Cuisine: Asian Fusion
Ingredients
- 1 package instant ramen noodles (3 ounces / 85 grams)
- 2 cups water (480 ml)
- 1 large egg, room temperature
- ¼ cup frozen mixed vegetables (about 35 grams)
- 1 tablespoon soy sauce (15 ml)
- 1 teaspoon sesame oil (5 ml)
- ½ teaspoon garlic powder
- ½ teaspoon ginger powder (optional)
- 1 teaspoon sriracha or chili crisp (optional)
- ¼ cup sliced green onions (about 2 stalks)
- ¼ cup cooked chicken, shredded or diced (optional)
- ½ cup fresh spinach or bok choy (optional)
- 1 tablespoon butter (optional)
- 1 teaspoon rice vinegar (optional)
- ¼ cup canned corn, drained (optional)
Instructions
- Bring the water to a boil (2-3 minutes). Pour 2 cups of water into your saucepan and set it over high heat. While waiting, slice green onions and crack the egg into a small bowl or mug.
- Add the noodles and vegetables (3 minutes). Once the water is boiling, drop in the ramen brick and frozen vegetables. Break the noodle block apart gently with a fork. Let everything boil together for about 2 minutes, stirring occasionally, until noodles are loosening but still have a slight bite.
- Add the egg (1 minute). Reduce heat to medium-low so the water is at a gentle simmer. Gently pour the egg into the pot, stirring slowly in one direction for wispy egg ribbons. For a poached egg, don’t stir; let it sit in the simmering water for about 45 seconds until the white is set but yolk is runny.
- Season the broth (30 seconds). Sprinkle in about half the ramen seasoning packet, then add soy sauce, sesame oil, garlic powder, and ginger powder. Stir gently to combine. Taste and adjust seasoning as needed.
- Add the finishing touches (30 seconds). If using sriracha or chili crisp, stir it in. Drop in most of the sliced green onions, reserving a few for garnish. Let everything cook together for another 30 seconds.
- Serve immediately. Pour everything into a bowl. Top with reserved green onions and any extra toppings like sesame seeds, chili oil, or torn nori.
Notes
For best results, don’t overcook the noodles—they should still have a slight resistance in the center. Season in layers: start with half the seasoning packet and adjust. Toast the sesame oil in the empty pot for 15 seconds for a nuttier flavor. Add green onions at the very end to keep them fresh. Always crack the egg into a separate bowl first to avoid shell bits. If using a microwave, cook noodles for 2-3 minutes, then add egg and vegetables and microwave for another 30-45 seconds.
Nutrition
- Serving Size: 1 bowl
- Calories: 400
- Sugar: 4
- Sodium: 900
- Fat: 17
- Saturated Fat: 4
- Carbohydrates: 48
- Fiber: 4
- Protein: 15
Keywords: ramen, budget, dorm, easy, quick, egg drop, upgraded ramen, college meal, late night, comfort food