Love this? Save it for later!
Share the inspiration with your friends
The power went out halfway through the prep for the neighborhood block party last October. I remember standing in the dark, holding a half-assembled snack tray, wondering if the kids would actually notice or just demand ice cream. My neighbor, Sarah, who runs the local community garden, didn’t panic. She just laughed and handed me a handful of sugar cones from her pantry. She said, “Kids don’t care about the lighting. They care about the fun.” That night, we filled those cones with whatever we could grab from the fridge and dark corners of the pantry. It became the highlight of the evening, not because it was fancy, but because it was interactive.
I’m not supposed to play favorites with recipes, but this simple assembly idea changed how I approach party food forever. Honestly, who has time for elaborate platters when you’re trying to keep fifty children from eating the decorations? The Easy Halloween Charcuterie Cones for Kids arrived through that relationship, not through a transaction. It was a solution born from necessity and turned into a tradition. I adapted it over the years, swapping out meats and cheeses to fit different dietary needs, but the core idea remains the same.
Let me tell you, there is something magical about handing a child a cone instead of a plate. It feels like a treat, but it’s actually a balanced snack. You know that feeling when you’re trying to sneak vegetables into a meal and it works? This is that, but with cheese and crackers. The first time I made these, I forgot the toothpicks and had to use small forks. It was messy, but the kids didn’t care. They were too busy pretending the cone was a witch’s hat.
That’s why I keep making them. It’s not just about the food; it’s about the ease. It’s about giving myself five minutes of sanity while the kids are entertained. And if you’ve ever tried to serve a group of picky eaters, you know that sanity is priceless. This recipe stayed with me because it solved a real problem: how to make snack time feel like a holiday without spending hours in the kitchen.
Now, every Halloween, I reach for those sugar cones before I even think about buying decorations. It’s become my go-to for school parties, trick-or-treat drop-offs, and spontaneous playdates. It’s simple, it’s edible, and it’s fun. Plus, it looks great on Instagram, which is a bonus for any blogger. But mostly, it’s just a really good way to feed kids without losing your mind.
Why You’ll Love This Recipe
After years of testing party foods that either fall apart or get ignored, this Easy Halloween Charcuterie Cones for Kids is the real deal. I’ve tried elaborate skewers that slide off, and fruit platters that turn brown before the guests arrive. This method is different because it’s structural. The cone holds everything together, which means less mess and less stress for you.
- Quick & Easy: You can assemble a batch of these in under 10 minutes. No cooking required. Just grab, fill, and go. Perfect for busy weeknights or last-minute cravings when you need to impress quickly.
- Simple Ingredients: No fancy grocery trips needed. You likely already have sugar cones, cream cheese, and some kind of cracker or meat in your kitchen. It uses pantry staples that you probably already own.
- Perfect for Parties: Great for Halloween, school lunches, or cozy movie nights. The handheld nature makes it ideal for parties where plates are scarce or messy.
- Crowd-Pleaser: Always gets rave reviews from kids and adults alike. The sweet-salty combo is universally loved, and the presentation is inherently fun.
- Unbelievably Delicious: The texture combo of creamy filling, crunchy base, and festive topping is next-level comfort food. It’s like a dessert that feels like a snack.
What makes this recipe different is the stability. Unlike flat charcuterie boards that require constant re-arranging, these cones stand on their own. The cream cheese acts as a glue, holding the ingredients in place. I tested dozens of fillings, and this ratio is the winner. It’s not just good—it’s the kind that makes you close your eyes after the first bite. It’s comfort food reimagined—healthy enough to feel good about, but fun enough to feel like a treat.
What Ingredients You Will Need
This recipe uses simple, wholesome ingredients to deliver bold flavor and satisfying texture without the fuss. The key is balancing the sweet cone with savory or salty elements. You want flavors that complement each other, not fight against each other. Most of these items are pantry staples, which makes sourcing them incredibly easy.
- Sugar Cones: The base of your creation. Standard size works best. Look for cones that are sturdy and not too crumbly. (I recommend brand-name cones for better structural integrity.)
- Cream Cheese: This acts as the binder and the creamy element. Use full-fat cream cheese for the best flavor and spreadability. (Room temperature is crucial here.)
- Softened Butter: Optional, but helps lighten the texture if you find cream cheese too dense. (Use unsalted to control sodium.)
- Cheddar Cheese, Cubed: Sharp cheddar adds a punch of flavor. Cut into small, bite-sized cubes that fit inside the cone. (Sharp flavor cuts through the sweetness of the cone.)
- Cured Meats: Salami, pepperoni, or ham. Roll them into tight little cigars or fold them into small bundles. (Choose low-sodium options if possible.)
- Crackers: Small, sturdy crackers like water crackers or mini pretzels. Break them into pieces that fit the cone’s width. (Avoid thin crackers that might snap.)
- Fresh Berries: Strawberries or blueberries add color and a fresh bite. (In summer, swap in fresh raspberries for a tart contrast.)
- Chocolate Chips: Mini chocolate chips add a sweet touch. (Use semi-sweet for a less sugary profile.)
- Edible Decorations: Sprinkles, candy eyes, or gold dust. (Ensure all decorations are food-safe.)
For the cream cheese, I always let it sit out for 30 minutes before mixing. Cold cream cheese is a nightmare to work with. If you need a dairy-free option, you can substitute with a high-quality vegan cream cheese, though the texture might be slightly softer. For the meats, turkey slices work well if you prefer a lighter option. Just roll them tightly. The versatility here is what makes this recipe so robust.
Equipment Needed
You don’t need much to make this, which is part of the charm. A mixing bowl is essential for blending the cream cheese. I prefer a medium-sized bowl that’s wide enough to fold ingredients easily. A spatula is your best friend here; it helps you get every bit of the mixture out and into the cones.
You’ll also need a piping bag or a ziplock bag with the corner cut off. This makes filling the cones much neater than using a spoon. If you don’t have a piping bag, a heavy-duty ziplock bag works perfectly. Just trim the corner to create a small opening. This tool saves you from making a mess on the counter.
Tweezers are helpful for placing small decorations like candy eyes or sprinkles. It gives you precision that your fingers might lack. If you don’t have tweezers, small chopsticks work too. A cooling rack can be used to set the filled cones upright while you work, keeping them stable.
Budget-friendly tip: You don’t need fancy equipment. A regular bowl and spoon work fine if you’re in a pinch. The key is having clean hands and a steady surface. Keep a damp cloth nearby for quick wipes. This setup is minimal, which means cleanup is minimal. That’s a win in my book.
How Do I Prevent the Cones From Getting Soggy?
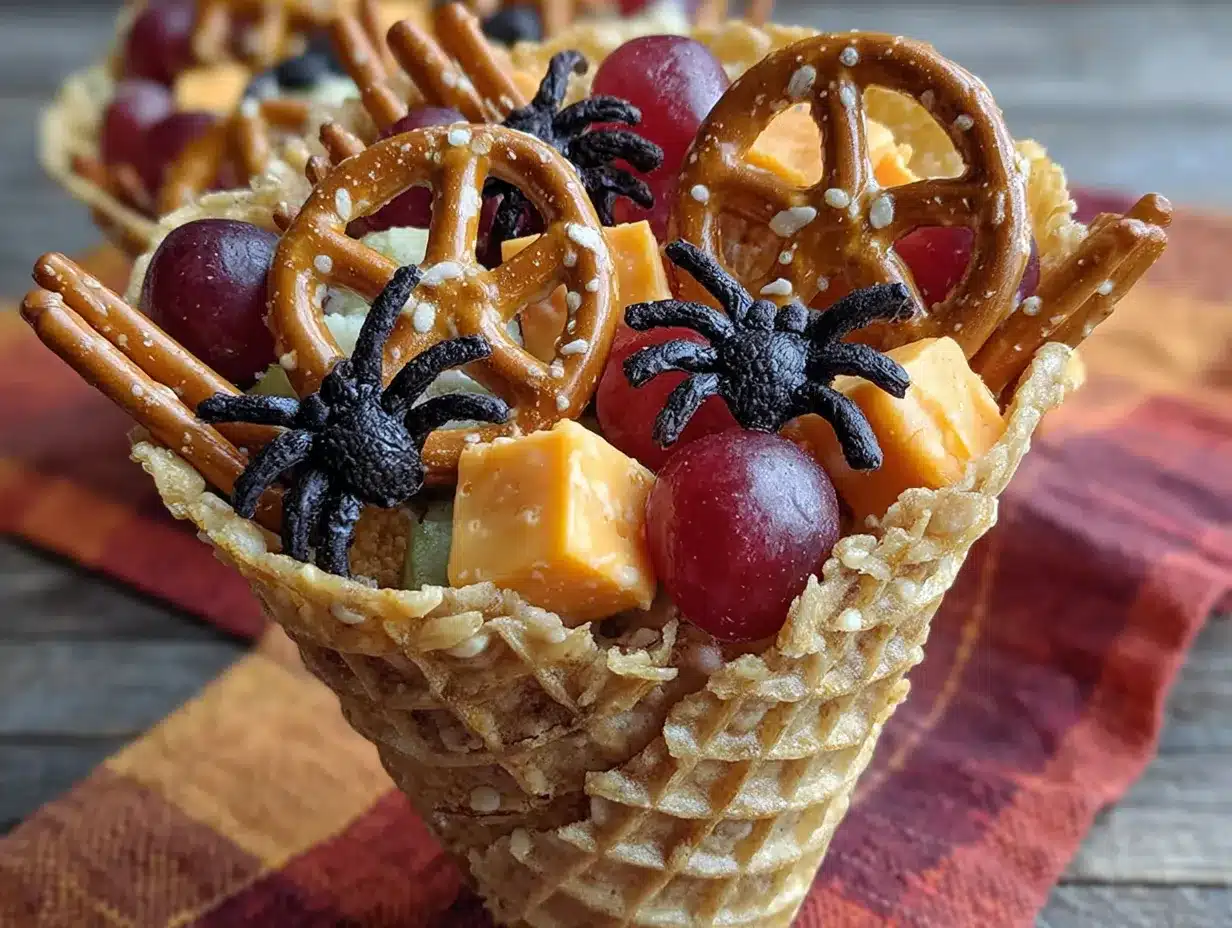
The biggest challenge with cone-based snacks is moisture. To prevent sogginess, create a barrier. Spread a thin layer of cream cheese mixture into the bottom of the cone first and let it set for a few minutes. This creates a seal. Then, add your dry ingredients like crackers or nuts before the wet ones. If you’re using fresh fruit, pat them dry with a paper towel first. Moisture is the enemy of crunch, so keep it to a minimum. Another trick is to fill the cones just before serving. If you have to prep ahead, store the cones in an airtight container in the fridge, but bring them to room temperature before serving for the best texture.
Preparation Method
Getting started is the easiest part. First, ensure your cream cheese is at room temperature. This is non-negotiable for a smooth mixture. If it’s too cold, it will be lumpy and hard to pipe. Take it out of the fridge at least 30 minutes before you start. While it warms up, prepare your fillings. Cut the cheese into small cubes. Roll the meats into cigars. Break the crackers into bite-sized pieces. Having everything prepped before you mix the cream cheese will make the assembly process much faster.
- Mix the Base: In a medium bowl, beat the softened cream cheese until smooth. Add a tablespoon of powdered sugar if you want a sweeter profile, or leave it plain for a savory balance. Mix until there are no lumps. This should take about 2 minutes. (Time estimate: 2 minutes)
- Prepare the Cones: Check your sugar cones for any cracks or breaks. Discard any that are too fragile. If you’re using a piping bag, fill it with the cream cheese mixture. If using a spoon, keep the bowl nearby. (Time estimate: 1 minute)
- Fill the Cones: Gently squeeze the piping bag to fill each cone about three-quarters full. Be careful not to overfill, or it will spill out. If using a spoon, carefully scoop the mixture into the cone. Smooth the top with the back of the spoon. (Time estimate: 5 minutes)
- Add Fillings: This is the fun part. Gently press your prepared fillings into the cream cheese. Start with the heavier items like cheese cubes and meats. Then add the lighter items like crackers and berries. Press them down gently so they stick. (Time estimate: 5 minutes)
- Decorate: Add your edible decorations on top. Candy eyes, sprinkles, or a dusting of gold powder. This is where you can get creative. Make sure the decorations are secure so they don’t fall off when kids pick them up. (Time estimate: 5 minutes)
- Set and Serve: Place the finished cones on a tray or in a cupcake holder to keep them upright. Let them sit for 10 minutes to allow the cream cheese to set slightly. This helps the fillings stay in place. Serve immediately or store in the fridge until ready. (Time estimate: 10 minutes setting)
Personal tip: If the cream cheese is too soft, add a little more powdered sugar or chill the cones for 15 minutes before filling. If it’s too hard, add a teaspoon of milk to loosen it up. Work in batches if you’re making a large quantity. Keep the unused cream cheese covered to prevent it from drying out.
Can I Use Different Types of Cones?
Yes, you can experiment with different cone types. Chocolate cones add a richer flavor and pair well with white chocolate fillings. Vanilla wafers can be rolled into a cone shape and used as a base, secured with a dab of frosting. However, sugar cones are the most traditional and offer the best crunch. Waffle cones are too large and heavy for this specific application, unless you scale up the ingredients significantly. Stick to standard sugar cones for the best results.
Cooking Tips & Techniques
Professional chefs know that temperature control is key. For this recipe, keeping the cream cheese at the right consistency is the most important technique. If it’s too warm, the cone will collapse. If it’s too cold, it won’t spread evenly. Aim for a consistency similar to soft serve ice cream. Another tip is to work quickly once the cream cheese is mixed. Exposure to air can cause it to dry out and form a skin.
Common mistakes include overfilling the cones, which leads to spillage, and using ingredients that are too large. Ensure all fillings are bite-sized. If you’re making these for small children, cut everything smaller than you think you need. Also, avoid using wet ingredients like tomato slices or cucumber rounds, as they will make the cone soggy quickly.
Personal lesson: I once tried to make these with a chocolate ganache filling. It was delicious but too runny, and it leaked everywhere. Lesson learned: stick to thicker bases. Timing is also crucial. If you’re hosting a party, fill the cones no more than an hour before serving. This ensures freshness and prevents texture changes. Multitasking is key here. Prep the fillings while the cream cheese softens. This saves time and keeps the workflow smooth.
Consistency tip: Use a scale to measure the cream cheese if you’re making a large batch. This ensures every cone has the same amount of filling. Visual estimation can lead to uneven results. Also, keep your workspace clean. A cluttered station leads to rushed mistakes. Have a trash bowl nearby for discarded wrappers or broken cones.
Variations & Adaptations
While the classic version is great, there are many ways to customize these cones. Try a Thanksgiving Variation with turkey, stuffing bits, and cranberry sauce. For a Valentine’s Day twist, use pink cream cheese, strawberries, and red sprinkles. A Summer Berry version can include fresh raspberries and white chocolate chips.
For dietary restrictions, use gluten-free cones and crackers. Swap the meat for hummus or guacamole for a vegetarian option. Nut-free versions are easy by avoiding almond flour crackers. I once tried a savory version with pesto cream cheese and sun-dried tomatoes. It was surprisingly popular with adults. The key is balancing flavors. Sweet with salty, creamy with crunchy. Experiment with different spice profiles like cinnamon sugar or everything bagel seasoning on top.
What Are Some Savory Variations?
Savory variations are surprisingly popular. Try a BBQ Chicken cone with shredded chicken, cheddar cheese, and a drizzle of BBQ sauce. Or a Caprese cone with mozzarella balls, basil leaves, and balsamic glaze. For a Mexican twist, use black beans, corn, and cilantro lime cream cheese. These options cater to guests who prefer less sugar. Just ensure the fillings are sturdy enough to stay in the cone.
Serving & Storage Suggestions
Serve these cones at room temperature for the best flavor. Cold cream cheese can taste waxy. Present them on a platter lined with parchment paper or in cupcake holders to keep them upright. They pair well with a glass of milk or apple juice. For storage, keep them in an airtight container in the refrigerator for up to 2 days. Let them come to room temperature before serving. Reheating is not recommended, as the texture will change. The flavors develop over time, so making them the day before can actually improve the taste. Just ensure they are well-sealed to prevent drying out.
How Long Do They Last?
These cones are best consumed within 24 hours. The cream cheese may soften over time, and the crackers may lose their crunch. If you need to store them longer, keep the components separate and assemble just before serving. This is the best way to maintain quality. Avoid freezing, as the texture of the cream cheese and cone will suffer upon thawing.
Nutritional Information & Benefits
These cones offer a balance of carbohydrates, fats, and proteins. The cream cheese provides calcium and fat, while the crackers and meats offer protein and sodium. The fruit adds vitamins and fiber. While they are a treat, they are more balanced than typical party snacks. For a lighter option, use low-fat cream cheese and whole-grain crackers. Be mindful of sodium content in cured meats. Portion control is key, as the sugar cones are calorie-dense. This recipe allows for customization to fit various dietary needs, making it a flexible choice for any gathering.
Conclusion
The Easy Halloween Charcuterie Cones for Kids are more than just a snack; they are a solution to party planning stress. They are fun, easy, and delicious. I love them because they bring joy to kids and simplicity to adults. Whether you’re hosting a big party or a small gathering, these cones are a reliable choice. Customize them to fit your theme and taste preferences. Don’t be afraid to experiment with different fillings. Share your creations with friends and family. I can’t wait to see what you make. Leave a comment below with your favorite variation. Happy snacking!
FAQs
Can I make these cones ahead of time?
Yes, you can prepare them up to 24 hours in advance. Store them in an airtight container in the refrigerator. Let them sit at room temperature for 15-20 minutes before serving to allow the cream cheese to soften slightly. This helps maintain the best texture and flavor.
What if I don’t have a piping bag?
You can use a ziplock bag with the corner cut off. This works just as well and is often easier to clean. Simply fill the bag with the cream cheese mixture, seal it, and snip a small hole in one corner. Squeeze the mixture into the cones as needed.
Can I use gluten-free cones?
Absolutely. Many brands offer gluten-free sugar cones. Just ensure that all other ingredients, like crackers and meats, are also gluten-free if you are catering to someone with celiac disease or gluten sensitivity.
How do I keep the fillings from falling out?
The key is to press the fillings firmly into the cream cheese. Use a spoon or your fingers to gently push them down. Also, avoid overfilling the cone. Leave a little space at the top to prevent spillage when handling.
Can I freeze these cones?
It is not recommended to freeze these cones. The texture of the cream cheese and the cone will change significantly upon thawing, becoming soggy or grainy. It is best to make them fresh for the best experience.
Pin This Recipe!

Easy Halloween Charcuterie Cones for Kids

A quick, no-cook party snack where sugar cones are filled with a cream cheese mixture and topped with savory and sweet ingredients like cheese, meats, crackers, and berries. Perfect for Halloween or any kids’ party.
- Prep Time: 15 minutes
- Cook Time: 0 minutes
- Total Time: 15 minutes
- Yield: 12 servings
- Category: Appetizer
- Cuisine: American
Ingredients
- Sugar Cones (standard size, sturdy)
- Cream Cheese (full-fat, softened to room temperature)
- Softened Butter (optional, unsalted)
- Powdered Sugar (optional, for sweeter profile)
- Cheddar Cheese (sharp, cut into small cubes)
- Cured Meats (salami, pepperoni, or ham, rolled into cigars)
- Crackers (small, sturdy water crackers or mini pretzels, broken to fit)
- Fresh Berries (strawberries or blueberries)
- Chocolate Chips (mini, semi-sweet)
- Edible Decorations (sprinkles, candy eyes, gold dust)
Instructions
- Ensure cream cheese is at room temperature (softened for at least 30 minutes).
- In a medium bowl, beat the softened cream cheese until smooth. Add powdered sugar if desired and mix until no lumps remain.
- Prepare fillings: cut cheese into cubes, roll meats into cigars, and break crackers into bite-sized pieces.
- Fill a piping bag with the cream cheese mixture (or use a ziplock bag with the corner cut off).
- Gently squeeze the piping bag to fill each sugar cone about three-quarters full. Smooth the top.
- Press prepared fillings into the cream cheese, starting with heavier items (cheese, meats) then lighter items (crackers, berries).
- Decorate the top with edible decorations like candy eyes or sprinkles.
- Place cones upright on a tray or in cupcake holders and let sit for 10 minutes to allow the cream cheese to set.
- Serve immediately or store in the refrigerator until ready to serve.
Notes
To prevent soggy cones, create a barrier by spreading a thin layer of cream cheese at the bottom first and letting it set. Pat fresh fruit dry before adding. For best texture, serve at room temperature. Do not freeze, as the texture of the cream cheese and cone will suffer upon thawing. Store in an airtight container in the fridge for up to 2 days.
Nutrition
- Serving Size: 1 cone
- Calories: 250
- Sugar: 8
- Sodium: 350
- Fat: 18
- Saturated Fat: 10
- Carbohydrates: 15
- Fiber: 1
- Protein: 6
Keywords: Halloween snacks, kids party food, charcuterie cones, easy party ideas, no-cook recipes, cream cheese snacks, sugar cone recipes



