Love this? Save it for later!
Share the inspiration with your friends
I was standing in the checkout line at the craft store last November when the smell hit me—that weird, waxy-sweet scent of artificial cinnamon from a display of holiday candles. And just like that, I was seven years old again, sitting cross-legged on my Aunt Lorraine’s linoleum kitchen floor, a tube of neon green frosting in my hand, trying to make a turkey cookie that looked like anything other than a mutant blob. She had this way of not caring how they turned out. She’d just smile, take a bite of the ugliest one, and say, “That one’s my favorite.”
Aunt Lorraine passed a few years back, and honestly, I haven’t touched a tube of store-bought frosting since. But every Thanksgiving, I find myself trying to get back to that feeling—the one where the cookies don’t have to be perfect, they just have to be made. That’s how these Easy Royal Icing Turkey Sugar Cookies came to be. I wanted something that looked impressive enough to bring to a potluck or a classroom party but didn’t require a pastry degree or a four-hour decorating session. Maybe you’ve been there too—wanting to make something special without losing your entire afternoon and your patience.
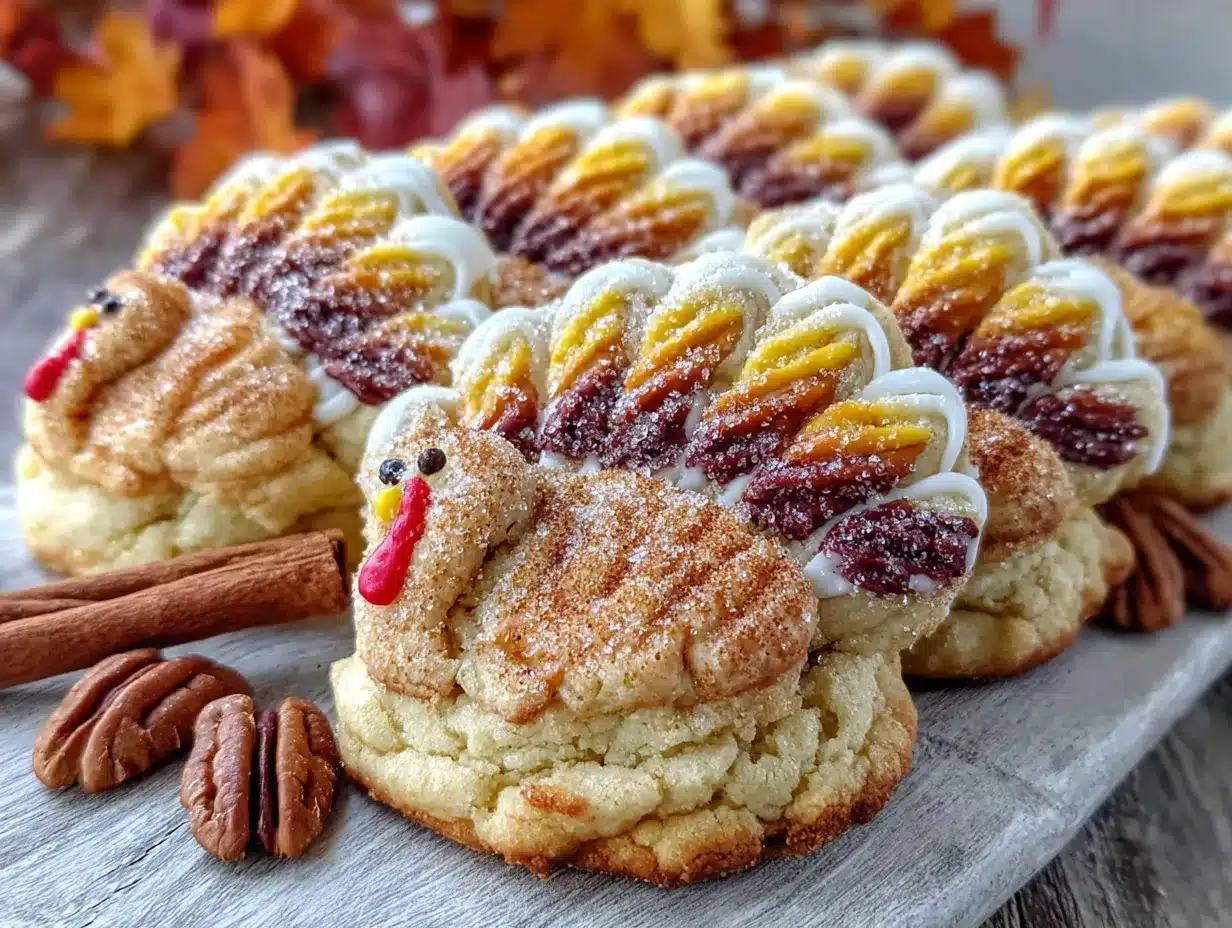
These cookies use a simple sugar cookie base and a quick royal icing that sets firm enough to stack but stays soft enough to bite into without cracking a tooth. The turkey design is straightforward, with a few piping tricks that make them look way harder than they actually are. I’ve tested this recipe three times now—once with my niece, once while half-watching football, and once at 10 PM on a Tuesday because I couldn’t sleep. It works every time. This is the recipe that keeps that feeling alive, and I think Aunt Lorraine would be proud. Even if a few of them still look like mutant blobs.
Why You’ll Love This Recipe
Let’s be real for a second. Holiday baking can feel like a whole extra job. Between the shopping, the rolling, the chilling, the baking, and the decorating, it’s easy to burn out before you even get to enjoy the results. These Easy Royal Icing Turkey Sugar Cookies are designed to fix that. They look like you spent hours on them, but the whole process is streamlined for real people with real schedules.
- Quick & Easy: The sugar cookie dough comes together in about 15 minutes, and the chilling time is only 30 minutes—not the usual hour or more. You can have these baked and cooled within an hour of starting.
- Simple Ingredients: Butter, sugar, flour, eggs, vanilla, and a few pantry staples for the icing. No weird extracts or specialty flours. You probably already have everything.
- Perfect for Thanksgiving: Whether you’re making them for a classroom party, a Friendsgiving gathering, or just to snack on while the turkey roasts, these cookies fit right in. They’re festive without being fussy.
- Crowd-Pleaser: I brought a batch to my neighbor’s potluck last week, and they were gone before the pie was even sliced. Kids love the design, adults love the taste, and everyone loves that they’re not too sweet.
- Unbelievably Delicious: The cookie itself is soft in the middle with slightly crisp edges—the perfect canvas for the royal icing. And the icing sets with a slight sheen that makes them look professionally made.
What makes this recipe different from the dozens of others out there? It’s the balance. The royal icing is thick enough to hold its shape when piping the turkey feathers but thin enough to flood the body smoothly. I’ve tested the consistency ratios until they’re foolproof. Plus, I’ll show you a trick for making the turkey feathers look layered without needing multiple piping bags. This isn’t just another sugar cookie recipe—it’s the one that finally makes holiday decorating feel fun again.
This recipe is the kind that makes you close your eyes after the first bite. It’s comfort food reimagined—faster, simpler, but with the same soul-soothing satisfaction you expect from a holiday treat. Perfect for impressing guests without stress, or turning a simple November evening into something memorable.
What Ingredients You Will Need
This recipe uses simple, wholesome ingredients to deliver a soft, buttery sugar cookie that holds its shape during baking and provides the perfect base for royal icing. The ingredients are all pantry staples, and I’ve included substitution notes where they actually work.
For the Sugar Cookies:
- 1 cup (226g) unsalted butter, softened — I prefer using Land O’Lakes for its consistent fat content, but any brand works. Make sure it’s truly softened, not melted. Softened butter should give slightly when you press it with your finger.
- 1 cup (200g) granulated sugar — Regular white sugar creates the right texture. Don’t substitute with brown sugar here; it will make the cookies spread too much.
- 1 large egg, room temperature — Cold eggs can seize the butter mixture. If you forgot to take it out ahead of time, place the egg in a bowl of warm water for 5 minutes.
- 1 teaspoon vanilla extract — Pure vanilla extract makes a difference. Imitation works in a pinch, but the flavor won’t be as rich.
- ½ teaspoon almond extract — This is my secret ingredient. It adds a subtle nuttiness that complements the royal icing beautifully. You can omit it if you prefer plain vanilla cookies.
- 2 ½ cups (312g) all-purpose flour — Spoon and level your flour. Scooping directly from the bag can pack in too much flour, making the cookies dry.
- ½ teaspoon baking powder — This helps the cookies puff slightly without losing their shape.
- ¼ teaspoon salt — Balances the sweetness and enhances the butter flavor.
For the Royal Icing:
- 3 cups (360g) powdered sugar, sifted — Sifting is non-negotiable here. Lumps in the powdered sugar will create lumps in your icing, and nobody wants that.
- 2 tablespoons meringue powder — I recommend Wilton brand for reliability. Meringue powder gives royal icing its structure without using raw egg whites.
- 4-5 tablespoons warm water — Start with 4 tablespoons and add more as needed. The consistency should be thick enough to hold a ribbon on the surface for a few seconds when you lift the spoon.
- ½ teaspoon vanilla extract — Optional but recommended. It adds a subtle flavor that makes the icing taste less like pure sugar.
- Gel food coloring — I use Americolor brand. For these turkey cookies, you’ll need orange, red, yellow, and brown. Gel colors are more concentrated than liquid drops, so they won’t thin out your icing.
For Decoration:
- Candy eyes — These are optional but make the turkeys look adorable. You can also pipe the eyes with black icing.
- Orange sprinkles or nonpareils — For the turkey’s beak and wattle. You can also pipe these details if you prefer.
Ingredient Selection Tips: Look for meringue powder in the baking aisle near the cake decorating supplies. If you can’t find it, you can substitute with 2 large egg whites and skip the water, but the texture will be slightly different and the icing won’t keep as long. For the gel food coloring, a basic set of primary colors is all you need—you can mix orange and brown from red, yellow, and a tiny drop of blue.
Equipment Needed
You don’t need a fully stocked bakery to make these cookies. Here’s what you’ll actually use:
- Stand mixer or hand mixer — A stand mixer with the paddle attachment makes creaming butter and sugar effortless, but a hand mixer works just fine. You can even do it by hand with a wooden spoon, though your arm might get tired.
- Rolling pin — I use a French rolling pin without handles because it gives me more control, but any rolling pin works. If you don’t have one, a clean wine bottle can do the job in a pinch.
- Turkey-shaped cookie cutter — You can find these at craft stores or online. I got mine at Michaels for three dollars. If you don’t have one, you can use a round cutter and pipe the turkey shape freehand, but the cutter makes life much easier.
- Baking sheets — Light-colored aluminum sheets work best. Dark sheets can cause the bottoms to brown too quickly.
- Parchment paper or silicone baking mat — Parchment paper is cheaper and disposable. Silicone mats are reusable and provide even heat distribution. Both work well.
- Piping bags or zip-top bags — For the royal icing. Disposable piping bags are convenient, but a zip-top bag with the corner snipped off works perfectly. I’ve used both, and honestly, the zip-top bags are less intimidating for beginners.
- Small round piping tips (Wilton #2 or #3) — These give you control for piping the turkey feathers and details. If you’re using zip-top bags, you can skip the tips and just snip a tiny hole.
- Offset spatula or butter knife — For spreading the flood icing. An offset spatula is nice, but a regular butter knife works.
- Cooling rack — Essential for letting the cookies cool completely before decorating. Stacking warm cookies will make them soft and misshapen.
Budget-Friendly Options: If you’re just starting out, skip the fancy piping tips and use zip-top bags. You can find a pack of 50 for a couple of dollars. The cookie cutter can be found at dollar stores during the holiday season. Don’t feel pressured to buy expensive equipment—I decorated cookies for years with just a butter knife and a sandwich bag.
Preparation Method
Step 1: Make the Cookie Dough
In the bowl of your stand mixer (or a large bowl if using a hand mixer), cream the softened butter and granulated sugar together on medium speed until light and fluffy, about 3 minutes. Scrape down the sides of the bowl halfway through. The mixture should look pale and slightly increased in volume. Add the egg, vanilla extract, and almond extract, and beat on low until just combined. Don’t overmix here—you just want everything incorporated.
In a separate bowl, whisk together the flour, baking powder, and salt. With the mixer on low, gradually add the dry ingredients to the wet ingredients. Mix until the dough just comes together. It will look crumbly at first, then form a cohesive ball. If it seems too dry, add 1 teaspoon of milk. If it seems too sticky, add 1 tablespoon of flour. Turn the dough out onto a lightly floured surface and divide it in half. Flatten each half into a disk about 1 inch thick, wrap in plastic wrap, and refrigerate for 30 minutes. This chill time is crucial—it prevents the cookies from spreading during baking.
Step 2: Roll and Cut the Cookies
Preheat your oven to 350°F (175°C). Line two baking sheets with parchment paper or silicone mats. Remove one disk of dough from the refrigerator. On a lightly floured surface, roll the dough to about ¼-inch thickness. I use ¼-inch guide rings on my rolling pin for consistency, but you can eyeball it. If the dough starts to stick, dust the surface and the rolling pin with a little more flour.
Dip your turkey cookie cutter in flour before each cut to prevent sticking. Cut out as many cookies as possible, spacing them about 2 inches apart on the prepared baking sheets. Gather the scraps, gently press them together, and re-roll once. Avoid re-rolling more than once, as the dough can become tough. Repeat with the second disk of dough.
Step 3: Bake the Cookies
Bake the cookies for 8-10 minutes, rotating the baking sheets halfway through. The edges should be just barely golden, and the centers should look set but not brown. They will continue to cook slightly on the hot baking sheet after you remove them from the oven. Let them cool on the baking sheets for 5 minutes, then transfer them to a wire cooling rack to cool completely. Do not attempt to decorate warm cookies—the royal icing will melt and slide right off.
Step 4: Prepare the Royal Icing
In the bowl of your stand mixer fitted with the whisk attachment (or in a large bowl with a hand mixer), combine the sifted powdered sugar and meringue powder. Add 4 tablespoons of warm water and the vanilla extract. Mix on low speed until the ingredients are moistened, then increase to medium-high speed and beat for 4-5 minutes. The icing should be thick, glossy, and hold a stiff peak when you lift the whisk. If it’s too thick, add more water 1 teaspoon at a time. If it’s too thin, add more sifted powdered sugar 1 tablespoon at a time.
Divide the icing into separate bowls for each color. I use about ½ cup of icing for the brown (turkey body), ½ cup for the orange (feathers), ¼ cup for the red (wattle), and ¼ cup for the yellow (beak). Leave a small amount white for the eyes if you’re not using candy eyes. Add gel food coloring a tiny drop at a time until you reach your desired shade. For each color, you’ll need two consistencies: a stiff consistency for piping outlines and details, and a slightly thinner “flood” consistency for filling in the base. To thin icing for flooding, add water ¼ teaspoon at a time until the icing flows like honey and smooths out within 10 seconds of being piped.
Step 5: Decorate the Cookies
Start with the turkey feathers. Using the stiff orange icing in a piping bag fitted with a #2 tip, pipe an outline of the feather shape on the back of the turkey. Then, using the flood-consistency orange icing, fill in the outline. Use a toothpick to spread the icing into the corners and pop any air bubbles. Let the feathers set for 10 minutes before moving to the body.
For the turkey body, pipe an outline with stiff brown icing, then flood with the thinner brown icing. While the body icing is still wet, place two candy eyes or pipe two small dots of white icing for the eyes. For the beak, pipe a small triangle of yellow icing. For the wattle (that red dangly bit under the beak), pipe a small teardrop shape of red icing. If you want to add texture to the feathers, you can pipe small lines or dots of contrasting colors while the base icing is still wet.
Step 6: Let the Icing Set
Allow the decorated cookies to dry completely at room temperature. This usually takes 2-4 hours, depending on the humidity. The icing should be firm to the touch and not sticky. Do not stack the cookies until the icing is fully set, or you’ll ruin all your hard work. I usually let mine sit overnight.
Cooking Tips & Techniques
Consistency is Everything: The biggest mistake I made the first time I tried royal icing was making it too thin. The icing ran off the cookies and pooled on the parchment paper, creating a sticky mess. Aim for a consistency where the icing holds a ribbon on the surface for 5 seconds when you lift the spoon. If you’re unsure, test a small amount on a scrap piece of parchment. It should hold its shape for a moment before slowly smoothing out.
Keep the Dough Cold: I learned this lesson the hard way. I once tried to skip the chilling step because I was in a hurry, and my turkeys came out looking like sad, flattened blobs. The butter in the dough melts too quickly at room temperature, causing the cookies to spread. If your dough feels soft or sticky at any point, pop it back in the fridge for 10 minutes.
Use a Damp Paper Towel: When you’re not actively using your piping bag, cover the tip with a slightly damp paper towel. This prevents the icing from drying out and clogging the tip. I can’t tell you how many times I’ve had to stop mid-feather to unclog a tip because I forgot this step.
Don’t Overbake: Sugar cookies should be pale golden, not brown. If you wait until the edges are dark, the cookies will be dry and crumbly. Pull them out when the edges just start to turn color. They’ll look slightly underdone, but they’ll firm up as they cool.
Multitask Smartly: While the dough chills, prepare your royal icing. While the cookies bake, set up your decorating station. While the icing sets, clean up your kitchen. This keeps the process moving without feeling overwhelming. I usually bake the cookies one day and decorate them the next, spreading the work across two evenings.
Practice on Parchment: Before you decorate your first cookie, practice piping a few feathers and beaks on a piece of parchment paper. It takes the pressure off and helps you get a feel for the icing consistency. I still do this every time, even after years of practice.
Variations & Adaptations
Gluten-Free Version: Substitute the all-purpose flour with a 1:1 gluten-free baking flour blend that contains xanthan gum. I’ve tested this with Bob’s Red Mill 1:1 Baking Flour, and the cookies turned out slightly more tender but still held their shape beautifully.
Vegan Adaptation: Use vegan butter (I like Earth Balance) and a flax egg (1 tablespoon ground flaxseed mixed with 3 tablespoons water, let sit for 5 minutes). For the royal icing, use aquafaba (the liquid from a can of chickpeas) instead of meringue powder. Whip 3 tablespoons of aquafaba with the powdered sugar until stiff peaks form. It works surprisingly well.
Flavor Twists: Add 1 teaspoon of cinnamon and ½ teaspoon of nutmeg to the cookie dough for a spiced version. Or swap the vanilla extract for orange extract and add 1 tablespoon of orange zest for a citrusy twist. I made a batch with the orange variation last year, and they tasted like a creamsicle in cookie form.
Different Shapes: Don’t have a turkey cutter? Use a leaf-shaped cutter for the feathers and a round cutter for the body, then arrange them on the cookie sheet to form a turkey shape before baking. Or just make round cookies and pipe the turkey design entirely with icing—it’s more work, but the result is impressive.
No-Icing Option: If you’re short on time or patience, skip the royal icing entirely. Bake the cookies, let them cool, and dust them with powdered sugar. Or drizzle with a simple glaze made from 1 cup powdered sugar and 2 tablespoons milk. It won’t look like a turkey, but it’ll still taste amazing.
Personal Variation: Last Thanksgiving, I made a batch with a pinch of cayenne pepper in the cookie dough. It added a subtle warmth that paired perfectly with the sweet royal icing. My brother-in-law ate six before anyone noticed. I’d call that a win.
Serving & Storage Suggestions
These cookies are best served at room temperature. The royal icing should be fully set and firm to the touch, which usually takes 2-4 hours after decorating. Arrange them on a festive platter or tiered stand for maximum visual impact. They’re perfect for Thanksgiving dessert tables, classroom parties, or as edible place cards—just write each guest’s name on a cookie with a food-safe marker.
Storage: Store the decorated cookies in a single layer in an airtight container at room temperature. Place a sheet of parchment paper between layers if you need to stack them, but wait until the icing is completely dry to avoid smudging. They will stay fresh for up to 1 week. Do not refrigerate them, as the moisture in the fridge can make the icing sticky and the cookies soft.
Freezing: You can freeze the undecorated cookies for up to 3 months. Place them in a single layer in a freezer-safe container with parchment paper between layers. Thaw at room temperature before decorating. I’ve also frozen decorated cookies with success, but the icing can develop condensation when thawing. To avoid this, thaw them in the refrigerator overnight, then bring to room temperature with the container slightly open.
Flavor Development: Here’s something I’ve noticed over the years—these cookies actually taste better the day after decorating. The royal icing softens slightly as it absorbs moisture from the cookie, creating a texture that’s almost like a frosted sugar cookie from a bakery. If you can resist eating them immediately, they’re even better the next day.
Complementary Pairings: Serve these cookies with a warm mug of apple cider, a cup of spiced chai, or a glass of cold milk. They also pair surprisingly well with a scoop of vanilla bean ice cream for a fun dessert twist.
Nutritional Information & Benefits
Please note that these values are estimates and will vary based on exact ingredients and serving sizes. Per cookie (based on a 3-inch turkey shape, with royal icing):
| Nutrient | Amount |
|---|---|
| Calories | 185 |
| Total Fat | 8g |
| Saturated Fat | 5g |
| Cholesterol | 25mg |
| Sodium | 65mg |
| Total Carbohydrates | 27g |
| Sugars | 18g |
| Protein | 2g |
Health Benefits of Key Ingredients: While these are definitely a treat, there are a few redeeming qualities. The butter provides vitamin A, which supports eye health and immune function. The eggs contribute high-quality protein and choline, which is important for brain health. And the simple act of baking and decorating can be a form of mindfulness—it forces you to slow down and focus on the present moment.
Dietary Considerations: This recipe contains gluten, dairy, and eggs. I’ve included gluten-free and vegan variations above. The cookies are not low-carb or keto-friendly due to the sugar content. If you’re watching your sugar intake, you can reduce the sugar in the cookie dough by ¼ cup, but the texture will be slightly less tender.
Allergen Note: The almond extract is optional but contains tree nuts. If you have a nut allergy, simply omit it or substitute with more vanilla extract. The meringue powder is made from dried egg whites, so this recipe is not suitable for those with egg allergies unless you use the vegan aquafaba alternative.
Conclusion
These Easy Royal Icing Turkey Sugar Cookies are more than just a holiday treat—they’re a way to slow down, get a little creative, and share something handmade with the people you care about. The recipe is forgiving enough for beginners but rewarding enough for experienced bakers. And honestly, even if your turkeys look a little lopsided, they’ll still taste amazing.
I hope you give these a try and make them your own. Maybe add a sprinkle of cinnamon, pipe on some extra feathers, or let your kids go wild with the icing colors. There’s no wrong way to do this. That’s the whole point.
If you make these cookies, I’d love to hear about it. Leave a comment below and tell me how they turned out, or share a photo of your turkey creations. Did you try a fun variation? Did your kids invent a new decorating technique? Let’s keep the conversation going. And if you’re looking for more Thanksgiving baking inspiration, you might enjoy my pumpkin pie bites or this cranberry orange scones recipe.
Happy baking, friends. May your butter be soft, your icing be smooth, and your turkeys be proud.
Frequently Asked Questions
Can I make the cookie dough ahead of time?
Absolutely. You can prepare the dough up to 3 days in advance and keep it wrapped tightly in the refrigerator. Let it sit at room temperature for 10 minutes before rolling to make it easier to work with. You can also freeze the dough disks for up to 3 months.
Why did my royal icing turn out runny?
You probably added too much water. Royal icing is finicky about liquid ratios. Start with less water than you think you need and add it a teaspoon at a time. If you’ve already made it too thin, whisk in more sifted powdered sugar, 1 tablespoon at a time, until it thickens up.
Can I use store-bought frosting instead of royal icing?
You can, but it won’t set the same way. Store-bought frosting stays soft and won’t give you that smooth, professional finish. It’s also more likely to smudge when you stack the cookies. If you’re in a real pinch, you can use canned frosting, but the results won’t be as polished.
How do I get the icing to dry faster?
Low humidity is your friend. If your kitchen is humid, the icing will take longer to set. You can place the cookies in front of a fan on low speed to speed up the process. Avoid putting them in the refrigerator, as the moisture will make the icing sticky.
My cookies spread during baking. What went wrong?
The most common culprit is dough that wasn’t chilled long enough. Make sure you chill the dough for at least 30 minutes. Other factors include butter that was too soft, baking sheets that were too warm, or too much sugar in the dough. Next time, try chilling the cut-out cookies on the baking sheet for 10 minutes before putting them in the oven.
Pin This Recipe!
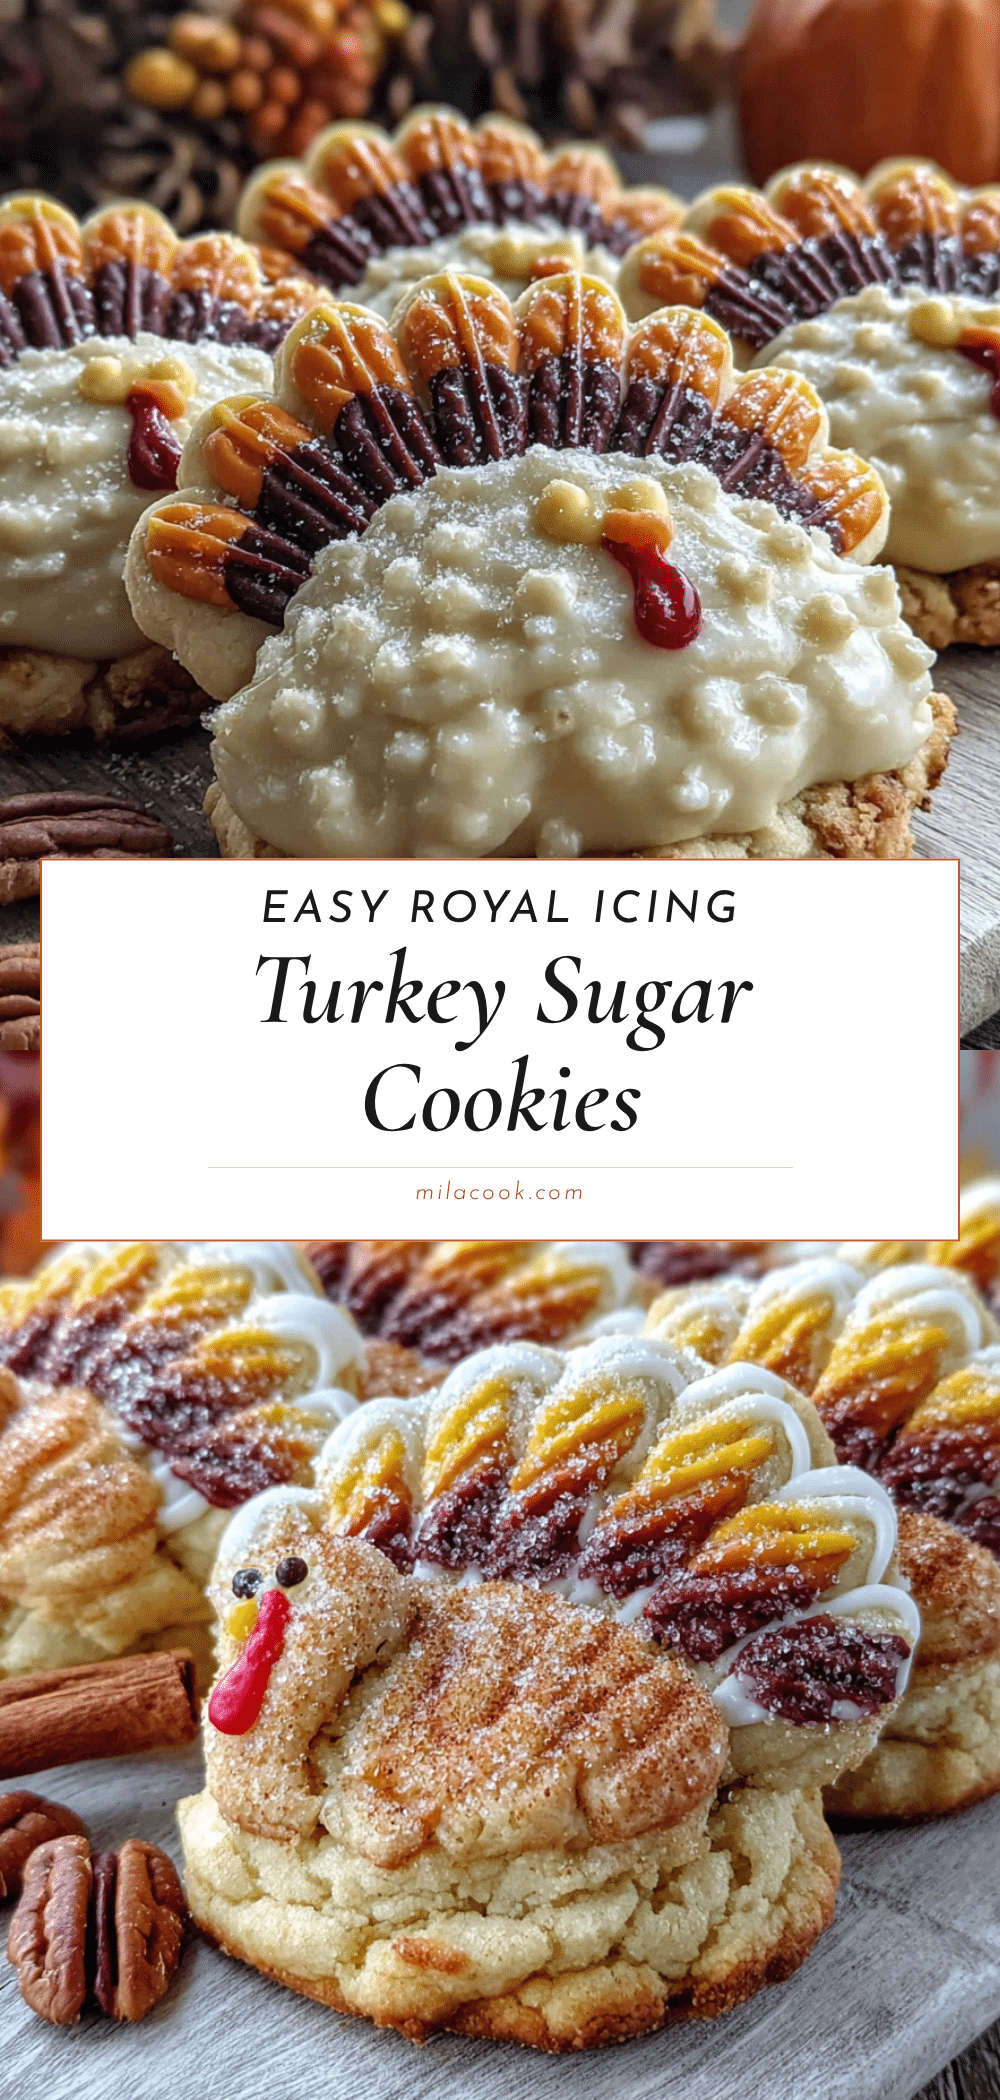
Perfect Royal Icing Turkey Sugar Cookies – Easy Recipe

These easy royal icing turkey sugar cookies use a simple sugar cookie base and a quick royal icing that sets firm enough to stack but stays soft enough to bite into. The turkey design is straightforward with piping tricks that make them look way harder than they actually are.
- Prep Time: 15 minutes
- Cook Time: 10 minutes
- Total Time: 55 minutes (including 30 minutes chilling)
- Yield: 24 servings 1x
- Category: Dessert
- Cuisine: American
Ingredients
- 1 cup (226g) unsalted butter, softened
- 1 cup (200g) granulated sugar
- 1 large egg, room temperature
- 1 teaspoon vanilla extract
- ½ teaspoon almond extract
- 2 ½ cups (312g) all-purpose flour
- ½ teaspoon baking powder
- ¼ teaspoon salt
- 3 cups (360g) powdered sugar, sifted
- 2 tablespoons meringue powder
- 4–5 tablespoons warm water
- ½ teaspoon vanilla extract (for icing)
- Gel food coloring (orange, red, yellow, brown)
- Candy eyes (optional)
- Orange sprinkles or nonpareils (optional)
Instructions
- Make the Cookie Dough: In the bowl of a stand mixer, cream the softened butter and granulated sugar together on medium speed until light and fluffy, about 3 minutes. Scrape down the sides halfway through. Add the egg, vanilla extract, and almond extract, and beat on low until just combined.
- In a separate bowl, whisk together the flour, baking powder, and salt. With the mixer on low, gradually add the dry ingredients to the wet ingredients. Mix until the dough just comes together. Turn the dough out onto a lightly floured surface, divide in half, flatten each half into a 1-inch thick disk, wrap in plastic wrap, and refrigerate for 30 minutes.
- Roll and Cut the Cookies: Preheat oven to 350°F (175°C). Line two baking sheets with parchment paper or silicone mats. On a lightly floured surface, roll one disk of dough to about ¼-inch thickness. Dip a turkey cookie cutter in flour and cut out cookies, spacing them 2 inches apart on the prepared baking sheets. Gather scraps, press together, and re-roll once. Repeat with the second disk.
- Bake the Cookies: Bake for 8-10 minutes, rotating the baking sheets halfway through. Edges should be just barely golden. Let cool on baking sheets for 5 minutes, then transfer to a wire cooling rack to cool completely.
- Prepare the Royal Icing: In the bowl of a stand mixer fitted with the whisk attachment, combine sifted powdered sugar and meringue powder. Add 4 tablespoons warm water and vanilla extract. Mix on low until moistened, then increase to medium-high and beat for 4-5 minutes until thick, glossy, and holds a stiff peak. Divide icing into bowls for each color. For each color, prepare a stiff consistency for piping outlines and a thinner flood consistency by adding water ¼ teaspoon at a time until it fl…
- Decorate the Cookies: Using stiff orange icing in a piping bag fitted with a #2 tip, pipe an outline of the feather shape on the back of the turkey. Fill with flood-consistency orange icing. Let set for 10 minutes. For the turkey body, pipe an outline with stiff brown icing, then flood with thinner brown icing. While wet, place candy eyes or pipe white dots. Pipe a small yellow triangle for the beak and a red teardrop for the wattle. Add texture to feathers with contrasting colors if desired.
- Let the Icing Set: Allow decorated cookies to dry completely at room temperature for 2-4 hours until firm to the touch. Do not stack until fully set.
Notes
Chill dough for at least 30 minutes to prevent spreading. Use gel food coloring to avoid thinning icing. Practice piping on parchment first. Cookies taste better the day after decorating. Store in airtight container at room temperature for up to 1 week. Freeze undecorated cookies for up to 3 months.
Nutrition
- Serving Size: 1 cookie
- Calories: 185
- Sugar: 18
- Sodium: 65
- Fat: 8
- Saturated Fat: 5
- Carbohydrates: 27
- Protein: 2
Keywords: turkey cookies, sugar cookies, royal icing, Thanksgiving cookies, easy holiday cookies